keyCloak
Keycloack is a software that allows you to configure secure login and authentication. Keyclocak provides user federation, strong authentication, user management and fine-grained authorization.
Features:
- Allows Identity brokering and social login.
- Implements identification with OpenID Connect, SAML 2.0
- user federation and implements your own providers
Integrations
The easiest way to make it works is with a Docker. They provides an image ready to use https://www.keycloak.org/server/containers . Also, you can use the pre-build container with the command:
docker run -p 8080:8080 \
       -e KC_BOOTSTRAP_ADMIN_USERNAME=admin \
       -e KC_BOOTSTRAP_ADMIN_PASSWORD=admin \
       quay.io/keycloak/keycloak:26.0.0 start-dev
As you can see, there are the user and the password to login inside the admin console. Both are admin.
The first step is create a new Realm, which is equivalent to a new client which
uses the services from a cloud provider. Once you has the new realm you can
create a new user which will have access to the login pages once you have
configured it.
Use keycloak as authentication system in your app
Understanding Realms in Keycloak
Keycloak utilizes several key concepts to streamline the authentication process, and one of the most fundamental is the realm. In their documentation, they define realms as:
A realm manages a set of users, credentials, roles, and groups. A user belongs to and logs into a realm. Realms are isolated from one another and can only manage and authenticate the users that they control.
In essence, creating and understanding what a realm is, is essential for managing users and access points effectively
Creating a Realm
In the upper left corner of your Keycloak interface, find the drop-down labeled “Keycloak Master” (or similar title). Click on it and select “Create Realm” and assign a new name for your new realm
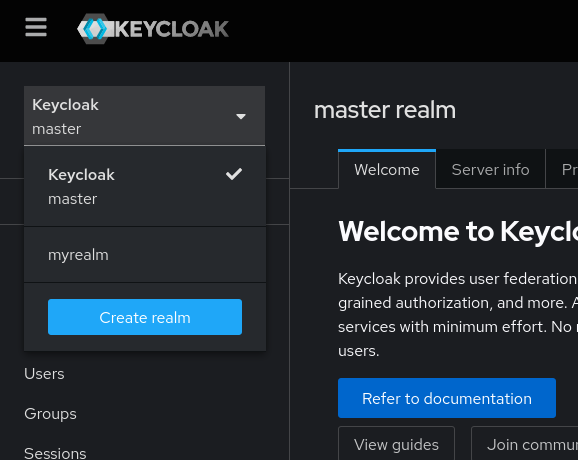
The selected drop-down, now should be labeled with the realm’s name, if not, select it.
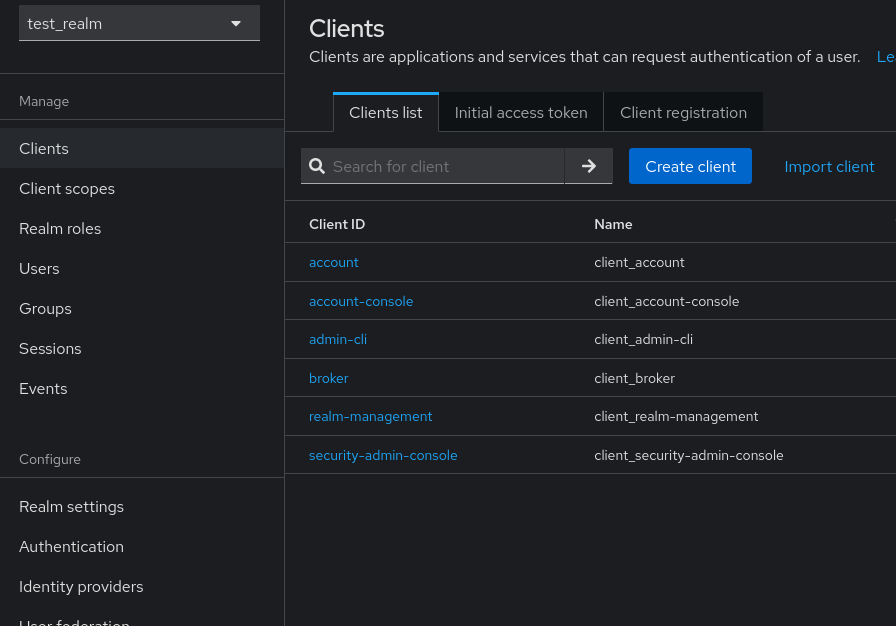
Configure a new client
Next, navigate to the left sidebar and click on the “Clients” option to create a new client.
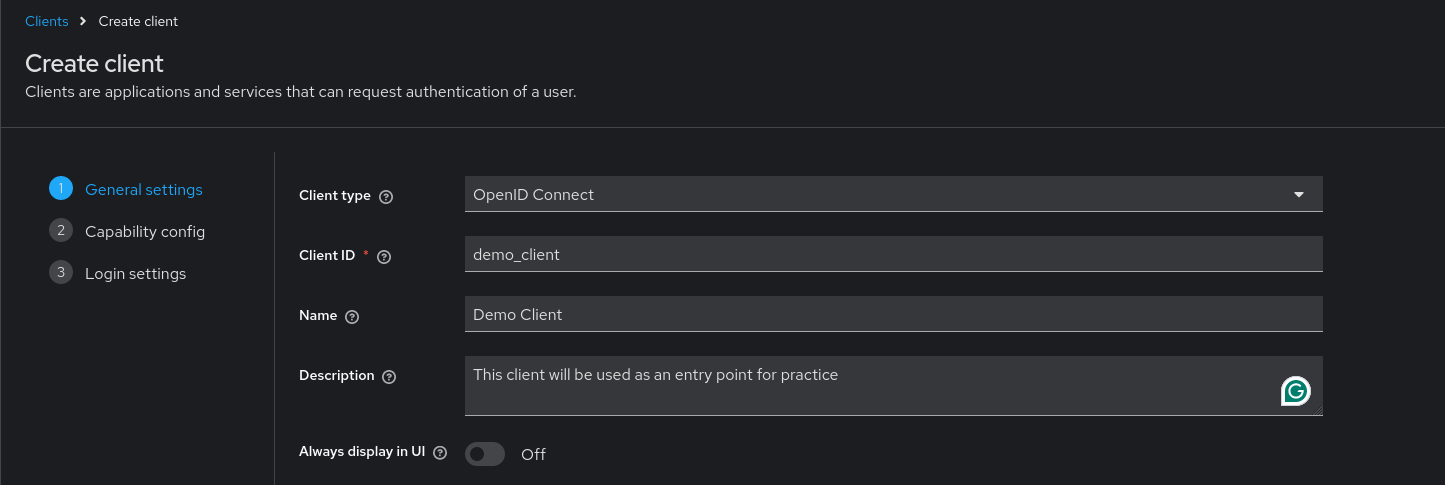
You can use the default option in Client Type, and complete the other fields as needed.
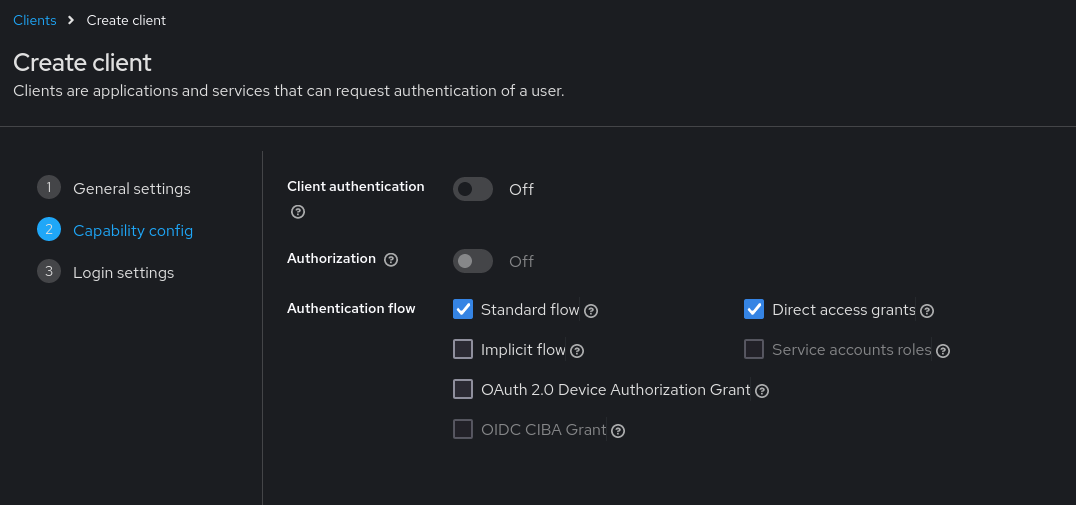
After clicking the Next button, you will reach the capability configuration menu.
- Set the Client Authentication to Off, otherwise it will not work.
- Turn Standard flow to On
- Optionally, keep Direct access grant enabled, although this is not mandatory.
- Ensure the rest of options remain disabled
The final step involves configuring the access settings, which requires careful attention to syntax. You can use the help tooltip to know more about each field. But the most important are
- The Root URL: which should end with an “/”
- Valid redirect URIs: A valid URI pattern that a browser can redirect to, after successful login. As it is a pattern, you need to append the wildcard character after the URL.
- Web origin All the urls that should be sent with the CORS Header
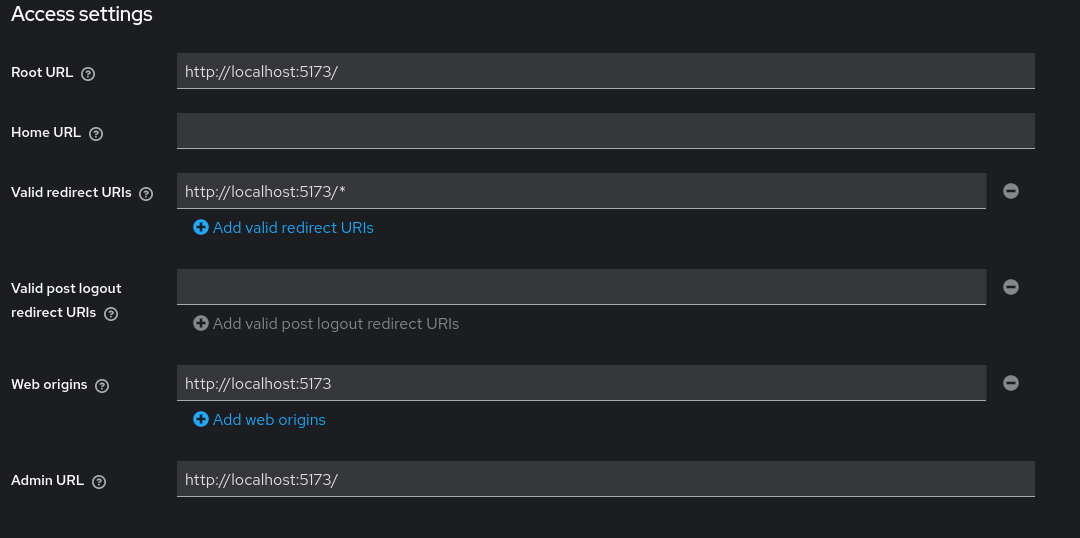
Pay special attention to the use of slashes, plus signs, and asterisks (wildcard character). Ensure that tour URL is formatted correctly, as even a small error could induce authentication problems. (access control problem , No ‘Access-Control-Allow-Origin’ header is present )
Integrating Keycloak with React: A Step-by-Step Guide
To integrate keycloak authentication with a React application, Keycloak provides
a set of adapters, including one for javascript applications (javascript adapter
).
Additionally, the community has developed @react-keycloak/web, an extension for
easier integration. Following these steps, you should avoid most of the problems.
Start by installing the required packages. You should adapt the command based on the package manager you are using.
npm install --save keycloak-js @react-keycloak/web
To initialize keycloak in your React app, create a new file at the root of your source folder. This file will set up the keycloak adapter configuration.
// keycloak.ts
import Keycloak from 'keycloak-js';

const keycloak = new Keycloak({
  url: "http://localhost:8080/",
  realm: "test_realm",
  clientId: "demo_client",
});

export default keycloak;
You should replace the URL with the address where your keycloak instance is
running (e.g., localhost:8080), and use the realm and clientId values you
configure earlier.
Next, wrap the components that require authentication within
ReactKeycloakProvider. This provider, from @react-keycloak/web, will manage
authentication state across your application. If your entire app requires user
login, wrap the root component, with the provider.
// App.tsx
import keycloak from './keycloak';
import { ReactKeycloakProvider } from '@react-keycloak/web';
import { AuthClientError, AuthClientEvent } from '@react-keycloak/core';

// .. rest of your logic
function AppWithAuth({children}: {children: React.JSX.Element}) {
  const { setAuthError } = useAuth();
  return (
    <ReactKeycloakProvider
      authClient={keycloak}
      onEvent={(event:AuthClientEvent, error?: AuthClientError) => {
        if (!setAuthError) return;
        handleKeycloakEvent(event, error, setAuthError);
      }}
    >
      <ThemeProvider theme={theme}>
        <CssBaseline />
        <PrivateRoute fallback={<Login />}>
          {children}
        </PrivateRoute>
      </ThemeProvider>
    </ReactKeycloakProvider>
  );
};
Here, ReactKeycloakProvider uses the authClient prop to connect with the
Keycloak instance. The onEvent prop listens for authentication events and
helps to handle any errors that occur during the authentication process.
Now, let’s create a helper component to control access based on the user
authentication state. This component, named PrivateRoute, will display protected
content only when the user is authenticated . Otherwise, it will display a
fallback page (e.g., login).
export default function PrivateRoute({children, fallback}:PrivateRouteProps): React.JSX.Element {
  const { keycloak, initialized } = useKeycloak();
  const [ isLoaded, setLoaded ] = useState(false);
  const [ errorMessage, setErrorMessage ] = useState<string>("");
  const { authError} = useAuth();

  useEffect(() => {
    if (authError) return setErrorMessage(authError);
    if (!initialized) return setLoaded(false);
    setLoaded(true);
    setErrorMessage("");
  }, [initialized, keycloak, authError]);

  return errorMessage ? <Error message={errorMessage} /> :
    !isLoaded ? <Loadding /> :
      keycloak.authenticated ? children :
        fallback;
};
In PrivateRoute, we use useEffect to monitor changes in authentication status
and manage errors, as the function will be execute each time one of its
dependencies changes.
initialized: Checks if Keycloak has completed loading.keycloak.authenticated: Confirms if the user is logged in.Fallback: Renders this component if the user is not authenticated, ensuring they’re redirected to a login page or similar interface.
References: